How to Set Up Your Wellness Program with Squarespace Member Areas
This post contains affiliate links, through which we may earn a small commission if you choose to purchase, at no additional cost to you. We only share products or services we personally use & recommend!
One of the most common “tech-y” things I help online health coaches with is setting up membership-protected content or health coaching client portals on their websites.
Of course, as I mention ad nauseam 😅, membership programs like online courses, video archives and resource libraries are some of the best ways to incorporate passive income streams to grow your health coaching business.
And, member portals that serve as a hub of helpful wellness information and resources for your health coaching clients can be a wonderful added value to professionalize and streamline your health coaching business operations… which, in turn, also helps you book your ideal clients and earn more income as a health coach!
Online membership program ideas for health coaches
Membership programs and membership-protected content are increasingly popular in online health coaching, both as paid products in and of themselves, as well as free opt-in gifts used as a strategy for growing your business’ email list.
Here are some of the (many!) ways to use membership programs in your health coaching business:
online courses
resource libraries
video archives
interactive membership groups
health coaching client portals
e-books, guides & other downloadable materials
the best membership-building tools for health coaches
There are two primary tech options I recommend for setting up an online membership program that helps both grow your audience and scale (or enhance) services for your health coaching business:
Squarespace Member Areas: a new “add on” to Squarespace websites
MemberSpace: a third-party tool that can be used with many website platforms, including Squarespace, WordPress, Wix, Weebly and more
I’ve mentioned before that we use MemberSpace for our membership programs, because it’s a robust and flexible membership-building tool, and the one I personally prefer. And, because it integrates with a range of website platforms, it tends to be the option I recommend most often to other health coaches too.
But, it’s also not the only good option out there! There are definitely some cases in which Squarespace Member Areas could be a better fit for your particular business.
This post on the tech options for building an online membership program for your health coaching business has more details on the difference between Member Areas vs. MemberSpace, and how to know which is best for you.
I love and recommend Squarespace for health coaching websites. We use it ourselves and it’s what I recommend to other health coaches and wellness professionals as the best platform to DIY your own professional website (or, to easily use and maintain the beautiful and professional website you hired a web designer to create for you).
If your health coaching website is on Squarespace, you’d be able to use either MemberSpace or Squarespace Member Areas to membership-protect pages and content on your website. Which means, either of these tools could be an option for building an online membership program or health coaching client portal for your business.
If it turns out Squarespace Member Areas is your tool of choice, here’s a step-by-step guide to setting it up on your Squarespace website!
HOW TO SET UP SQUARESPACE MEMBER AREAS for your health coaching business
Squarespace Member Areas is a simple way to add membership-protected pages to your existing Squarespace website. (If you don’t yet have a website, you can get a free 14-day trial of Squarespace!)
Here’s how to get started building your wellness membership program with Member Areas:
1. Enable Member Areas
Member Areas is a new feature not included in your Squarespace website subscription, though it can be easily added on to any Squarespace plan. (Pricing varies based on how many membership-protected “areas” you’ll have—more details on Member Areas pricing here.)
You can enable Member Areas on your site via Settings > Member Areas > and toggle to on.
Squarespace allows you try out and start building your new member areas without paying for the service, but you’ll need to upgrade to a Member Area plan to begin enrolling members.
Once you’ve enabled Member Areas, you’ll see a new section appear in your Squarespace pages panel:
This is where you’ll add all of your membership content.
2. Create your Member Area
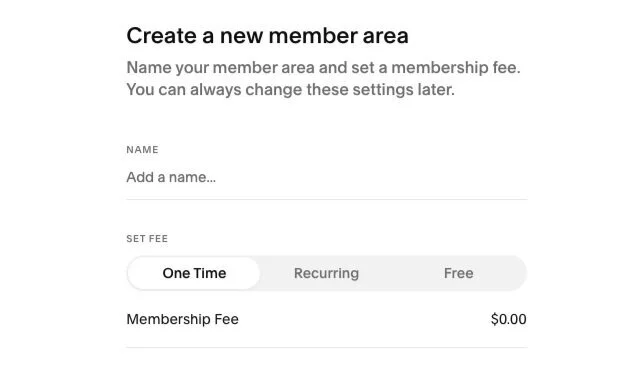
To create a new Member Area, click the + in the Member Areas section of your pages panel and follow the prompts to name your Member Area and set the fee associated with it.
Member Areas supports one-time payments, recurring subscription payments, and free memberships.
For subscription payments, you can select how often the fee will be charged (for example, every month, every year, etc.). Subscription products will be automatically billed to the member’s card on file until their subscription is canceled.
At this time, Member Areas does not support multiple payments, like a payment plan that lasts only a specific number of billing cycles, but does not continue forever.
Note: If you need use of the “multiple payment” option (like a payment plan, which is common for expensive health coaching programs), you’ll probably want to use MemberSpace instead of Member Areas.
3. Create a page for your Member Area
You’ll now see your new Member Area in the Member Areas section of your pages panel. Next up, we’ll add some content to it!
To create a new page within your Member Area, click + Add Page, and add a new page just as you would create any new page on your Squarespace website. Your member pages can be standard pages, index pages (if you’re on Squarespace 7.0), blogs, galleries, product pages, etc.—any type of page you can add to your Squarespace website.
If you have another page already created that you’d like to move to your Member Area, you can simply drag it there in your pages panel.
Just note that index pages cannot be used as a Member Areas homepage (which we’ll chat about in just a moment).
4. Add content to your member page
Continue adding membership pages and adding content to your pages as needed. You can add any Squarespace content blocks to your membership-protected pages, just as you would on any other non-membership-protected Squarespace page.
That means you can add text, images, videos, PDF downloads, or anything else you’ll be including in your membership program or client portal.
Each Member Area will need a designated homepage (where members arrive to when they log in), so designate your desired Member Area homepage in your page settings.
Your Member Areas pages will retain the same site-wide design settings as the rest of your Squarespace website.
5. Select your preferred member navigation option
Squarespace provides you a few different member navigation options, depending on the version you’re on (Squarespace 7.0 or 7.1).
Both versions allow you to choose between:
displaying Member Area navigation (i.e. a list of the pages your members have access to) in the Customer Account panel, which is something you can link to from your site’s primary navigation bar
or not displaying the Member Area navigation in your Customer Account panel.
(If you choose not to display the Member Area navigation there, you’ll just need to be sure members have a way to navigate to all of your membership-protected pages from their member homepage—I chat through that more in the Membership Lab, my online training in building + growing profitable membership programs.)
If you’re on Squarespace 7.1, you also have the ability to choose having your member navigation (all the pages members have access to in the particular Member Area they belong to) replace your site’s primary navigation when a member is logged in. (Cool!)
There are some pros and cons to each of these methods—which, again, I chat through in more detail in the Membership Lab.
6. Connect your payment processor
If you haven’t already (this would be set up if you have an active Squarespace Commerce shop), connect your payment processor via Settings > Member Areas > Payments.
You have the option to collect payment from your members via either Stripe, PayPal, or both. (I prefer and recommend Stripe!)
Your Payments page is also where you’ll select the currency for your Member Area, if needed. If you’ll be collecting taxes from your members, you can set that up via Settings > Member Areas > Taxes.
If you’ll be offering any discounts or special promotions for your Member Area sign-ups, you can set that up via Settings > Member Areas > Discounts.
Click the + to create a new discount code, and complete the form as applicable—for example, the code, specific amount or percentage off, start and end date, etc.
7. Customize your Checkout screen
Your Member Areas memberships use the Squarespace Commerce infrastructure as their checkout process, so if you haven’t already for other commerce purposes, you can update your Squarespace Checkout page via Design > Checkout Page.
There’s not a ton of customization potential here, but you can add your logo and update accent colors.
☝️ This example is from Five Design Co., my Squarespace web design agency—check it out for more detailed resources on Squarespace web design!
8. Customize your customer email notifications
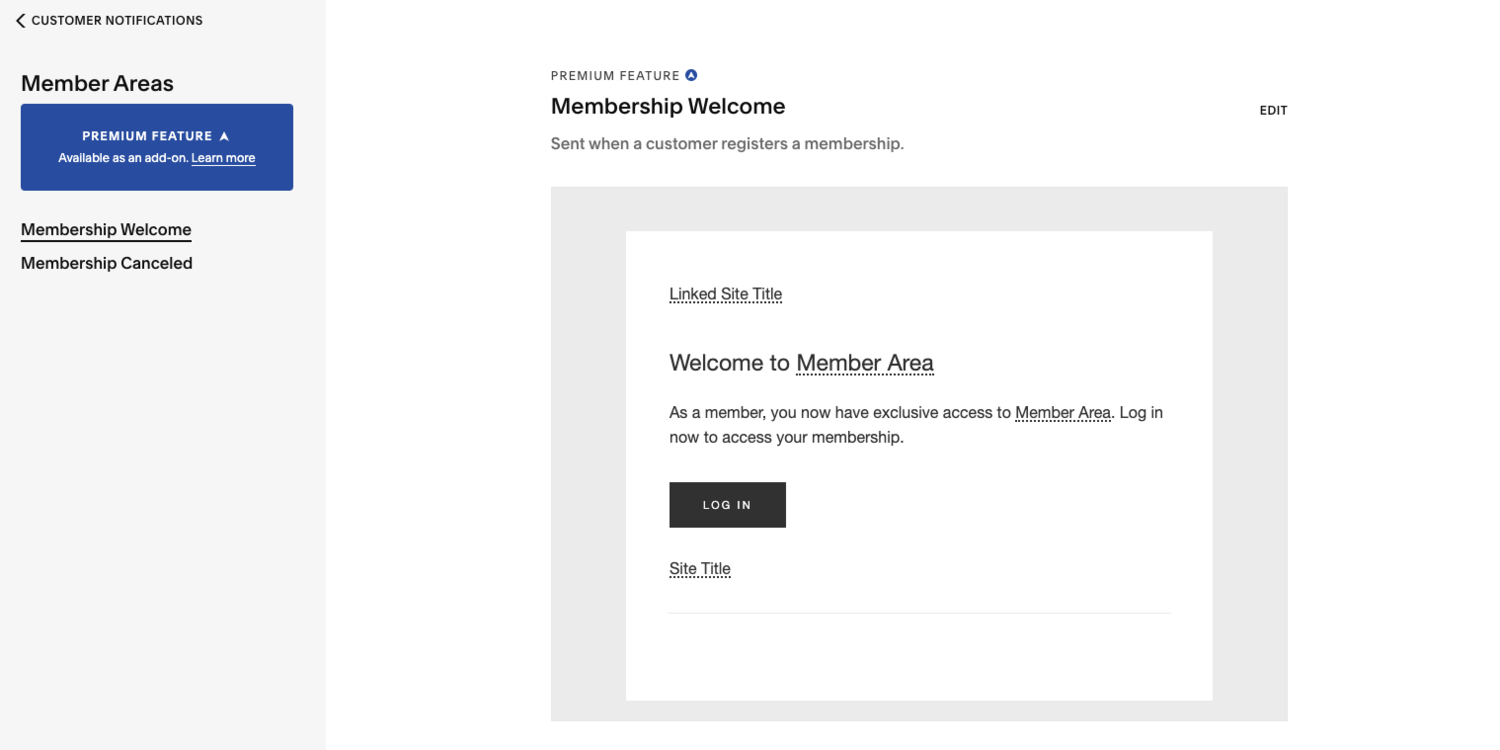
Your members will receive automated email notifications when they join (or leave) your Member Area:
a Membership Welcome Email when they join
and a Membership Cancellation Email when they cancel
These emails can be customized (somewhat) via Settings > Member Areas > Customer Notifications. You can customize some of the wording and font styling, as well as the email subject line. The email footer should be updated with your business information.
Note: Member Areas does connect nicely with Squarespace Email Campaigns, if you’d like to further communicate with your members there… but it doesn’t have a reasonable integration for connecting to other email tools (like Mailchimp, ConvertKit, Flodesk, etc.)—members would need to be manually exported and added to those other email platforms, which is certainly a pain.
Because I use and recommend Flodesk for email marketing, this is one of the reasons I choose to use MemberSpace instead of Squarespace Member Areas.
9. Customize the Access Denied Screen
When a non-member (or not-logged-in member) happens upon a membership-protected page, they’ll, of course, be stopped from accessing it. Instead of viewing the content of the membership-protected page, they’ll be redirected to your Access Denied Screen—a specific page that allows members to log in, and non-members to sign up.
On this page you can customize the headline and description displayed. Squarespace allows you to customize a unique Access Denied Screen for each Member Area you host.
10. Add your sign-up button
We’re almost done! The bulk of your Member Area has been set up, and now we’ll need a way for new members to purchase or sign up for it.
Your Member Sign Up button is simply a Squarespace content block, which you can find by clicking the teardrop icon to add a new block to your page, and scrolling down to Member Sign Up, which you’ll find in the “More” section.
Depending on your membership program needs, you can add your Member Sign Up block to any existing page on your Squarespace website, or you could design a specific sales page for your new Member Area.
Within each Member Sign Up block, you have the ability to customize which Member Area it applies to, as well as the button text, and how much information is set to display with the button (you have the option to include the Member Area title, description and price, if you’d like).
11. Test your Member Area
And, finally, before officially launching you’ll just want to do a quick walk-through to test your new Member Areas sign-up process and content and be sure everything looks great on desktop, mobile and tablet screen sizes!
More membership-building questions?
Check out our archives of passive income resources for health coaches, which includes more details on the different types of membership programs possible for health coaches and how to set them up with my two favorite membership-building tools, MemberSpace or Squarespace Member Areas.
Perfect your health coaching website
Grab my free checklist for optimizing your wellness website!
It’s got all the big picture must-haves (& all the important little details!) to make your health coach website shine. ✨


